
by Jack Wedekind, Master and Consulting Rosarian
If you want some concise no-nonsense steps that will result in good roses, consider the following Eleven Steps to Growing Good Roses:
1. Join Your Local Rose Society
2. Locate the Bed for the Best Growth
3. Buy Only #1 Rose Bushes
4. Plant Properly
5. Prune Established Roses
6. Fertilize
7. Water, water, water!
8. Spray
9. Pruning and Cutting Blooms
10. Look Forward to Winter in the Fall
11. Winterize Your Roses
Eleven Steps to Growing Good Roses
.
1. Join Your Local Rose Society
The Nashville Rose Society offers numerous forms of help for everyone interested in growing roses. The NRS has monthly meetings, usually on the first Sunday of each month at 2:00 PM, in Massey Hall at Cheekwood Estate and Gardens in Nashville. At the meetings, NRS leaders and special guests provide helpful presentations and answer questions.
The NRS leaders worked with Cheekwood to install and maintain the Cheekwood Rose Study Garden near the entrance. Everyone can enjoy the beauty of the roses planted there but, also, they can find living examples of roses they may want to grow and observe and participate in hands-on rose care demonstrations by the experts. And if you are reading this article, you have already discovered the NRS website which is full of helpful information.
2. Locate the Bed for the Best Growth
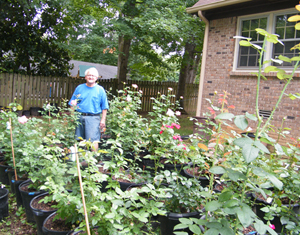
The rose bed should be located away from trees and shrubs with at least 4-6 hours of sun per day—preferably morning sun. Good drainage is essential! Consider raised beds or growing your roses in containers with drainage holes. For the last several years, I have grown our roses in containers. I can move my bushes in pots closer to our house where they are more protected from the cold, winter wind. I don’t have to be concerned that the roots of the forest trees in our yard will consume the nutrients I give my roses. I can more easily incorporate a rose bush in a pot into my landscaping. If a bush doesn’t thrive in a particular location, I can easily move it to another spot in my yard. But one of the best things about having all my roses in containers is not having to get down on my knees to work on them!
3. Buy Only #1 Rose Bushes

You can be sure you are getting #1 roses if you buy them through the Nashville Rose Society when they are selling them. Sources for roses in Nashville and Middle Tennessee are listed on the NRS website. No matter where you buy your #1 roses, purchase bare root roses and not those already in pots. The roots, which are the lifeline for the rose, are usually trimmed to make them fit in the pots.
4. Plant Properly
Roses can be planted in the spring whenever the soil can be worked—usually early April. Check your local weather forecast. Soak your bare root roses in water overnight before planting. When planting in the ground, dig the hole about 18” by 18” and 24” deep. When planting in containers, get 7 to 12 gallon containers with drainage holes on the sides at the bottom and not on the very bottom.
Fill the hole or the container 20% full with either Holy Cow Soil Mix in Hendersonville or Raised Bed Mix from your local nursery. Mix an NRS recommended fertilizer into the soil in the hole or container. Add an additional 40% of the same soil mix and mound it up in the center. Place the bare root rose over the mound spreading the roots out. Add the remaining 40% of the soil mix up to the bud union. Gently press the soil down. If you plant in a container, make sure to have the top of the soil about two inches below the rim. After planting be sure to water thoroughly.
5. Prune Established Roses
About the third week of March, depending on the weather, uncover existing bushes very carefully, moving back the mulch so as not to disturb any new growth. Prune canes one inch at a time until all dark brown discoloration in the center is gone and you reach wood that is only slightly discolored or all white. At this time you can gently work in an organic fertilizer and spray the bushes with a fungicide and insecticide. Recover the bushes with mulch. Between April 15 and April 23, when the danger of frost is gone, gradually pull the mulch away from the crown being careful not to damage new growth.
6. Fertilize
After the plant is well leafed out, use a balanced fertilizer. I recommend using both BloomKote and Mills Magic Rose Mix. Both are sold by Beaty Fertilizers. BloomKote is timed-released and applied one time in the spring. Mills Mix is an all-organic fertilizer that can be used in the spring and summer. Water the bushes well after working the fertilizer into the soil. Be sure to follow the manufacturer’s directions on whatever fertilizer you choose to use. Just remember that it is impossible to grow good roses without fertilization.
7. Water, water, water!
During the summer you should water most days it doesn’t rain—especially if you grow your roses in containers. Roses grown in containers require a lot more water than roses planted in the ground. Hopefully your roses are located in an area where the soil drains well so it would be hard to overwater. Always water thoroughly the day before you spray your bushes—preferably in the morning. Spraying under the leaves with a water wand can wash away many of the insects that may try to take over your rose bushes.
Water your roses during the winter if it doesn’t rain for two weeks straight. When I help people with their roses, I find that the number one reason their roses are not doing well is lack of sufficient water.
The best way to help your roses through the heat of July and August is to water sufficiently. Another way to help your roses beat the heat is to put three to four inches of mulch around them to help them retain water and keep them cooler.
8. Spray
Don’t wait until you have issues with black spot or insects to spray your roses! Black spot is one of the most difficult problems rosarians encounter. I have used a variety of fungicides and insecticides over the years. Recently I discovered Organocide—a fungicide and insecticide all in one liquid. This product is environmentally friendly and it will not harm helpful insects such as bees and butterflies.
To have good roses, you should spray every seven to ten days. Water your roses well the day before you spray. It’s best to spray in the morning. Never spray in the heat of the day. It’s OK to spray in the early evening. A simple pump sprayer from a garden center will do but be sure to dedicate it to your rose spray and don’t put other chemicals in it. Follow the directions carefully. In extremely hot weather use less Organicide to avoid a chemical reaction brought on by the heat.
9. Pruning and Cutting Blooms
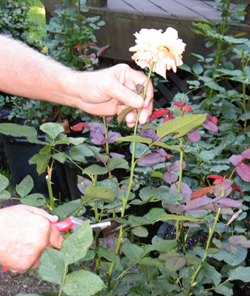
When someone admires roses I have grown, sometimes they say they want to come to our house to see our roses. I have to explain that they would have to look inside our 1928 General Electric Monitor Top Refrigerator in the garage. All of our bushes are in containers behind our house and we have a cutting garden. When the blooms are at the right stage of development, they all immediately go in buckets and vases filled with water and into my trusty, vintage, non-frost-free refrigerator. It’s worth all the work when we get to share three bouquets most every Sunday at our church.
10. Look Forward to Winter in the Fall
In early September stop fertilization to help the bushes begin the gradual process of going dormant. One reason for doing this is that new growth could be killed by an early frost and this could stress the plant as it goes into the winter season. During the fall, continue to water and spray regularly,
Fall is the ideal time to have your soil’s pH tested. The ideal pH is 6.5. To do this, take small samples of soil from several locations in your rose bed and put them in a plastic bag. You can find instructions on having your soil tested at your local Agriculture Extension office.
11. Winterize Your Roses
Sometime during the first two weeks of December is the ideal time to winterize your roses. After a minimum of two nights when the temperature is lower than 28 degrees, cut your roses back to 24” to 36” in height. Remove all the leaves. Seal all of the cut canes with Elmer’s Glue. Clean all debris from the soil. Triple the strength of whatever fungicide you have been using and spray the soil around your roses (not the bush) to help prevent disease in the spring. Over the base of each bush, mound up mulch, pine straw, leaves, or the soil mix you used to plant them. Be sure to cover each plant well.
In the fall and winter you can enjoy researching and ordering new roses to be delivered to your home at the appropriate time for spring planting.
If you have been inspired to start growing roses, I advise you to seek the wonderful help and advice available from the Nashville Rose Society. It is the best place to develop your hobby of growing and enjoying roses.